.
A Radiation Sensor Shield
.
For the Arduino Uno...


I've built a number of Arduino based projects ... usually related to bats ... but I have always been interested in making a logger that would monitor and record background gamma and X-ray radiation levels over long periods of time. This interest stems from living in Las Vegas all my life, where nuclear bombs were ( are ? ) tested not too far away.

After experimenting with a number of circuits, I settled on one that was published in the June, 2011 issue of Elektor Magazine, by Burkhard Kainka.

Interestingly, the article is not where I first saw this circuit, as it had also been used in a DIY kit I purchased to construct a hand-held radiation detector.

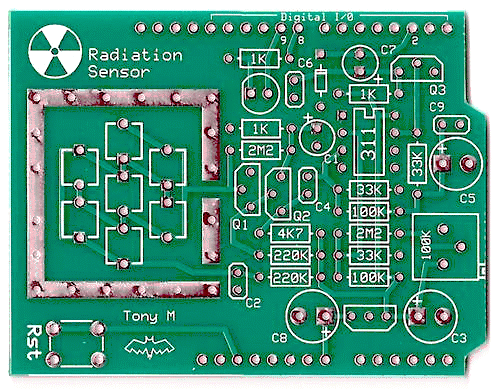
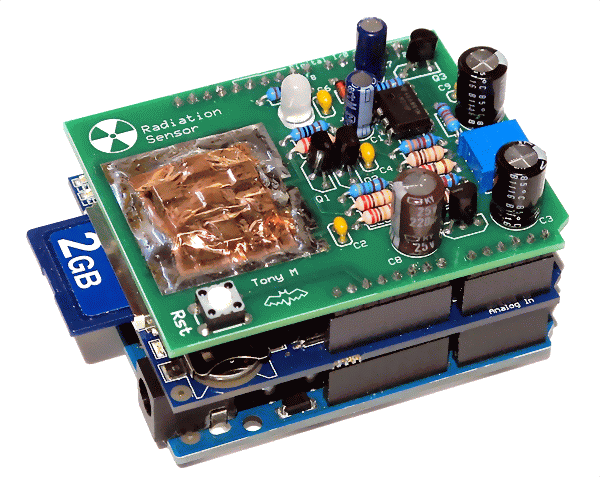
In any case, the circuit has some eccentricities, but actually works pretty well. You can see the finished Radiation Sensor shield on the top of the Arduino stack at the left.

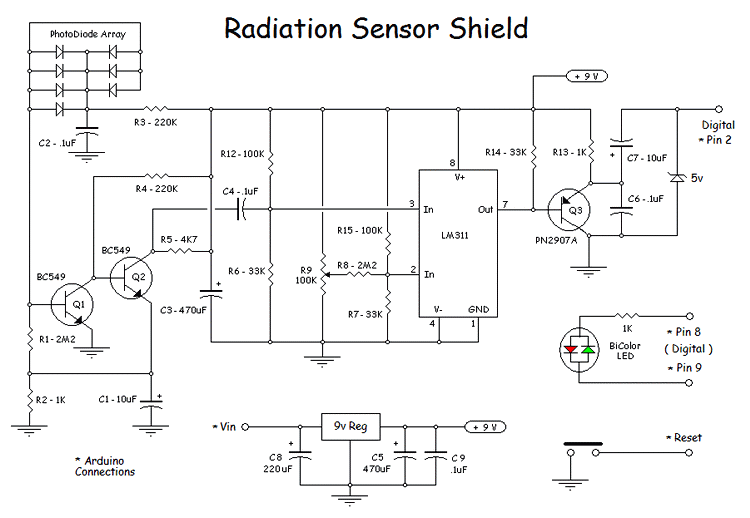
The complete schematic of the shield, as I finally built it, is shown in the diagram below...

The circuit is pretty straightforward... a 2 transistor pulse preamplifier feeds a comparator that is biased to pass only the high energy pulses that are caused by gamma and X rays.

The magic comes from the shielded, and reverse biased, array of BPW34 photodiodes that are actually pretty sensitive detectors of the radiation events we are looking for.

A bi-colored LED is provided on the shield to allow the Arduino to communicate something about what it's program is doing. The board also provides a regulated 9 volts for stability of the circuit, as well as the ever-present Reset button for the Arduino.

You get a good feel for the layout from the circuit board image shown to the right. The square of solder strips allow a copper foil shield to be tightly sealed around the photodiode array to minimize electrical noise and exclude light from the sensors. A similar shield is on the bottom side of the circuit board as well.

Even though the sensor array is shielded, it is still very sensitive to electrical noise. And having an Arduino board just below the sensor can really be a problem.

There is a solution though...

You need to write the sketch for the sensor so that there are no Arduino external circuits being switched ... the program needs to be working completely within the processor ... during sampling. I accomplish this by using a tightly coded sampling routine that uses a one line interrupt processor to add up pulses while the Arduino is in a relatively static 10 second sampling period. Sounds tricky, but it is pretty simple ... as can be seen from the sample code to the left.

The program loop shown sets the LED to indicate sampling is occuring, enables the interrupt routine, and goes into a 10 second delay. During a delay instruction, interrupts are still processed, so any sensor pulses that are detected are added up. After the delay, the interrupt is disabled, and processing can continue - in this case, the count result is sent to the serial display.

I have designed this limited run board for my own amusement. In it's final implemented configuration, it is matched up with a Data Recorder Platform that I have also designed. This reduces the stack from 3 boards to only 2 boards !

Feel free to email me if you have questions, or comments about this shield.


Tony Messina - Las Vegas, Nevada - email: T-Rex@ix.netcom.com - First published September, 2014