.
Tony's ArduBat Stack
.
A Multi-Function Project...


This page will demonstrate some of the applications that can be realized with the ArduBat and the Arduino UNO.

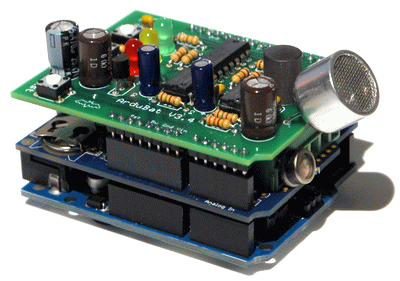
I call it my ArduBat Stack ... for reasons that are probably obvious. I wanted to create a test bed for several different types of bat related applications.

All of these boards are currently available, but the marketplace changes, and any of these boards may become extinct at any moment. Still, the ideas that these particular boards will demonstrate should still feed your imagination enough to set you off on your own path, with whatever boards you may find.

Keep in mind that I am not a professional programmer, so be kind when you read my code. It is meant to be an example of how something can be accomplished, but it may not be the absolutely best example of coding style. Frank is a much more experienced programmer, and his examples should also be examined.

Some of the circuits are still being developed, and the code is far from finished. Expect things to change as time passes and my project stack evolves. This web page will always reflect the way the project is currently ...

The first board of the project stack is one that will be on the bottom of any ArduBat project stack ... an Arduino UNO processor board ( mine is rev 3 ).

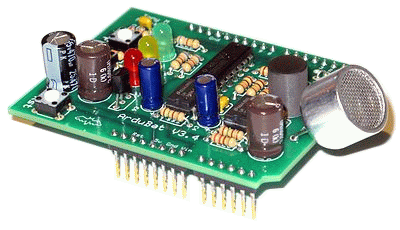
Right off the bat, I've made a change to the hardware. I removed the 6 pin ICSP header pins, as well as the 6 pins on the other connector. I did this to prevent shorts to the next board getting stacked on the Arduino board. I also added a layer of cellophane tape to the top of the USB connector !

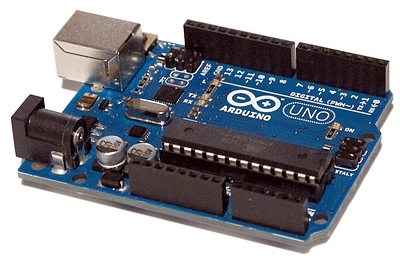
The Arduino UNO board provides the processing power for the stack. It provides all of the I/O capabilities, including serial communications. The form factor of the circuit board also defines the size and shape of all the rest of the boards in the stack... it is the reason that the ArduBat shield was designed in the size and shape that it is. So, the Arduino UNO is indeed the foundation of the project stack.

Stacked in the middle is the Adafruit # 1141 data logging shield. This board comes fully wired, and provides a real-time clock with battery back-up, an SD card interface, and a very useful amount of prototyping space. ( Be sure to get the optional stacking headers if you order one of these boards. ) You can also get the Arduino UNO board from Adafruit.

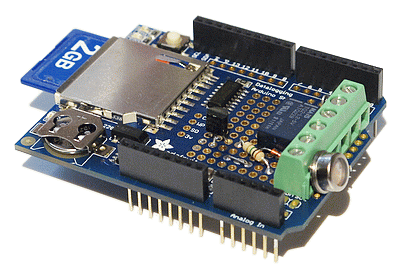
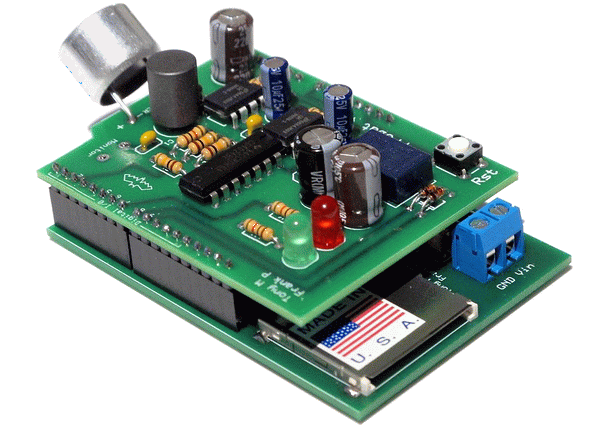
The 1141 also has two uncommitted LED indicators that are easily jumpered to digital pins 3 & 4. I've used these LEDs, the prototyping space, and the digital outputs of the two pins to operate a 5 volt, bi-stable, latching relay. This gives me the ability to program relay closure, as well as providing an indication of the signals doing so. I terminated the relay contacts with a terminal block, to make it easy to connect to whatever I wanted to control.

I've also included the parts to sense light, battery voltage, and temperature with three of the analog input pins of the Arduino. This board is busy !

Note: Later versions of this board have a different RTC chip ( 8523 ), so you will have to alter the example program as it uses the earlier DS1307 !!

The board on top is the business end of the project stack. It is the ArduBat shield itself ... of course. This shield is configured in the same way as described in the construction pages ... so there is nothing magic going on for this stack.
To the left is a sample of the bat activity log file format that I am developing. It is a bit different than Frank's format. ( This is an actual log of bats heard in my back yard ! ) Notice that there seems to be good consistancy in the data ... even though the TBC's seem a bit long.

The basic logging interval is one minute, during which bat calls are sampled, and measured. At the end of a ten minute interval, the activity index ( AI ), average frequency heard, and maximum time between calls ( TBC ) is summarized. Each of the ten minute lines includes a segment composed of ten characters ... either a dash ( - ) or a plus sign ( + ). The dash represents a minute where no bat call was detected, whereas a plus sign signifies that bat calls were heard.

At the end of each hour an hourly summary is written. Included in the summary are the ambient temperature, light level, and battery voltage.

The log also notes when the logging operation is stopped or started.

The logfile format is designed for visual interpretation, rather than automated processing. A different file format could be designed, that puts all of the data in comma separated fields, to be imported into a data base, or spread sheet. At this point, I am simply trying to see what the data collected looks like. You can download and read the sketch that I am currently using ... ArduBat2.ino ... but be aware that you may need to make changes for your particular hardware !!!

The activity index ( AI ) used in the log is adapted from a protocol proposed by Bruce W. Miller ( see the journal, Acta Chiropterologica, 2001, pp 93 - 105 ) . Bruce's AI was applied to larger time periods, and differentiated among species, but the key factor that I have used, is to index the number of one minute blocks that had bat calls, rather than trying to count bat calls, or figure out how to determine and count bat passes. Since the ArduBat is using a sampling method, the active / inactive minute parameter is easy to accurately obtain.

The average frequency, and time-between-call measurements, are relatively straight forward concepts. But, given the limitations on the frequency response of the ArduBat transducer, and the sampling method I use, there is a little more that needs to be explained. I am making this discussion a separate page, as I feel it requires a bit of back ground explanatory material to fully understand the capabilities and limitations of the pulseIn sampling technique.


UPDATE - March, 2016: After a year or so experimenting with the ArduBat, I decided to design a pre-assembled module for bat researchers that reduces the cost, size, number of boards, and power consumption - as compared to the 3 board ArduBat stack detailed here. The result is the Bat Call Data Recorder, or BCDR.

The BCDR uses a Bat Call Sensor board on the top that trades out the pushbutton switches and one LED on the ArduBat board, for a latching relay that can switch off ALL power to the bat detector circuits. This kills 15ma or more when the BCDR is not actively monitoring for bats ( during the day ).

The Data Recorder board, on the bottom of the stack, has an ATMEGA processor, TMP-36 temperature sensor, SD card interface, and a DS-1307 real time clock / calendar chip - with battery backup. When operating, the Data Recorder board draws 15 ma ... a little more when writing to the SD card. When the board is put into sleep mode, the current drain is less than 3ma. The board also has the facility to monitor the battery voltage and completely shut down when the battery is depleted.


Quick Links: ... Home ... Construction ... Configuration ... the Demo sketch ... Troubleshooting


Tony Messina - Las Vegas, Nevada - email: T-Rex@ix.netcom.com